


Install and activate your eSIM

Install your eSIM before travelling and activate it when you land

Scan your QR code to install your eSIM

Can’t scan the code? Install manually
Install your eSIM before travelling and activate it when you land
Scan your QR code to install your eSIM
Can’t scan the code? Install manually
Which device are you using?

Learn step by step
Choose your eSIM installation method for iPhone
Before you get started with QR code, do these three things:
- Have the QR code ready to be scanned on another screen or printed paper
- Ensure you have a stable connection with no dropouts
- Keep the instructions ready, as you only get one chance to install your eSIM
Do not remove the eSIM from your iPhone device, as you will not be able to use it again.
Before you get started manually, do these three things
- Open the email with the manual installation codes
- Ensure you have a stable connection with no dropouts
- Keep the instructions ready, as you only get one chance to install your eSIM
Do not remove the eSIM from your iPhone device, as you will not be able to use it again.
Ready to install your eSIM?
01.
Open your QR code email
You’ll need to scan the QR code with your phone, so open the email we sent you on another device.
Didn’t receive an email? Get in touch.
02.
Scan the QR code
The easiest way to install your eSIM is to open your iPhone camera and scan the QR code. If there’s a problem, open Settings on your phone and select Mobile Data. Next, click Use QR code, and you’re good to go.
03.
Follow the eSIM installation instructions
Scanning the code will start your eSIM installation. Follow the guide below for step-by-step instructions on how to set it up.
Activation guide for your eSIM

01. eSIM installation is automatic
Sit back and relax. Your eSIM installation process is automatic and will begin as soon as you scan the QR code.
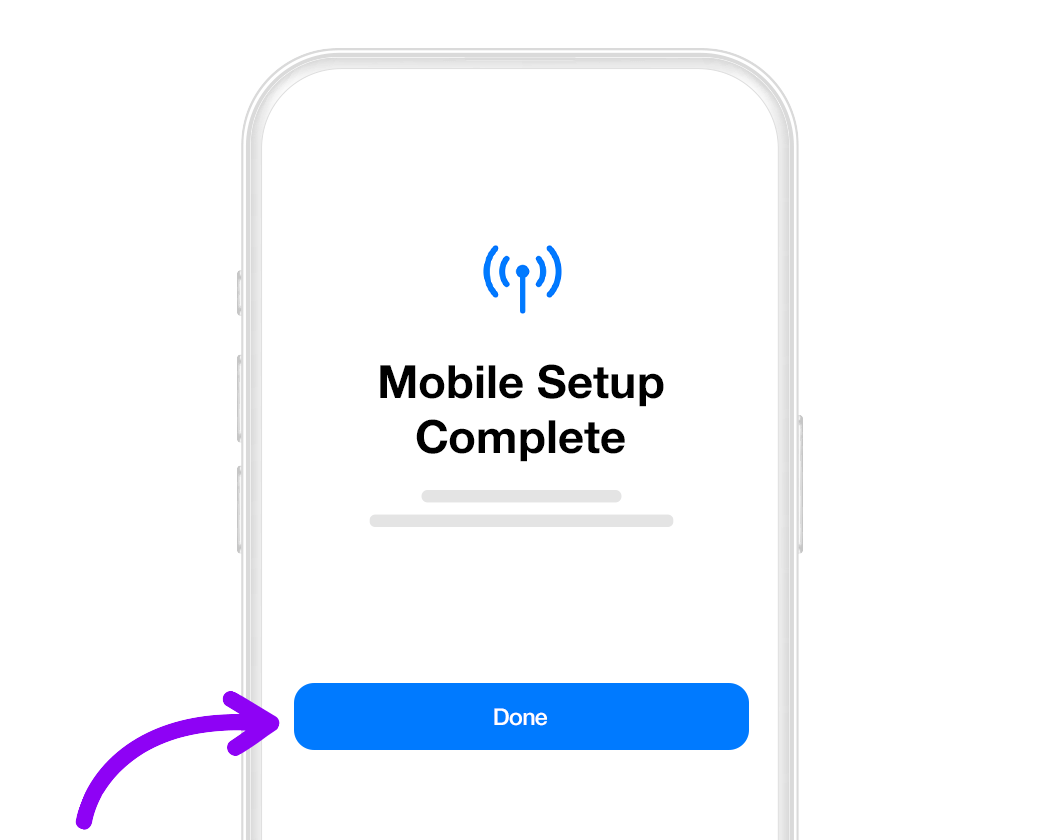
02. Cellular set-up complete!
When you see the message, your eSIM plan has been successfully installed.
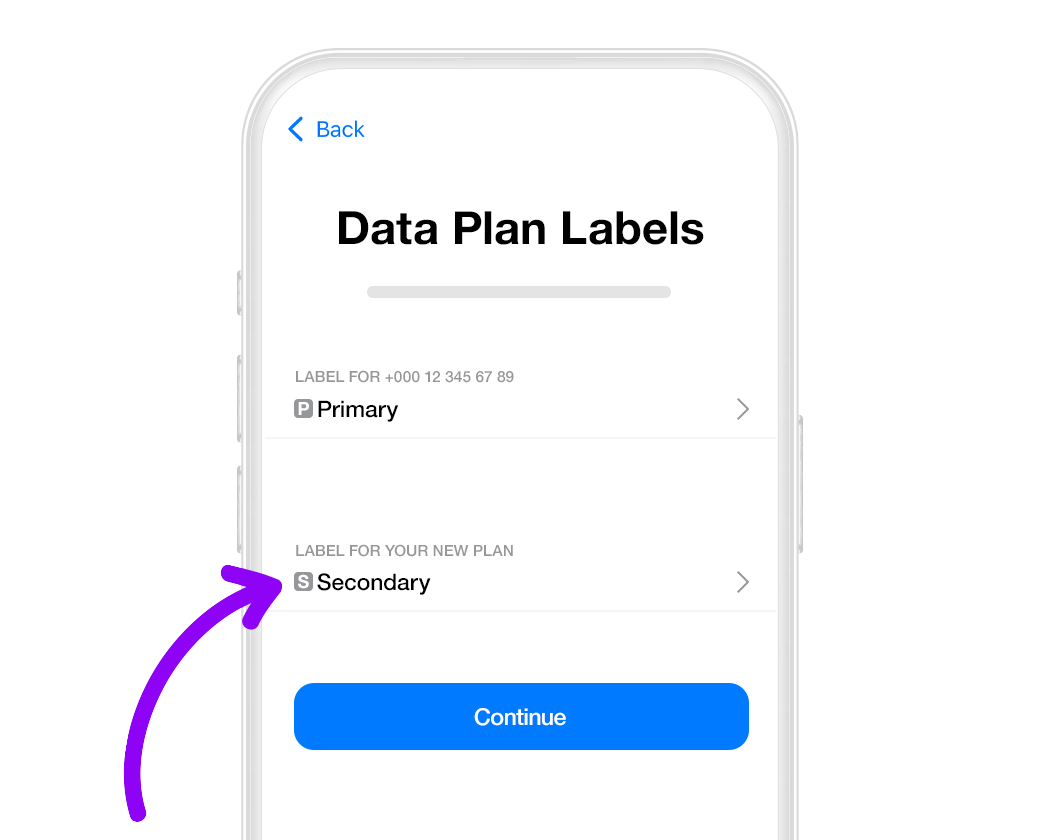
03. Give your plan a name
You can give your data plan a name to identify it. Something like Unlimited Data Croatia is clear and simple (but it’s up to you!)

Click the Primary option to continue to use your standard SIM to take and make calls and send SMS.

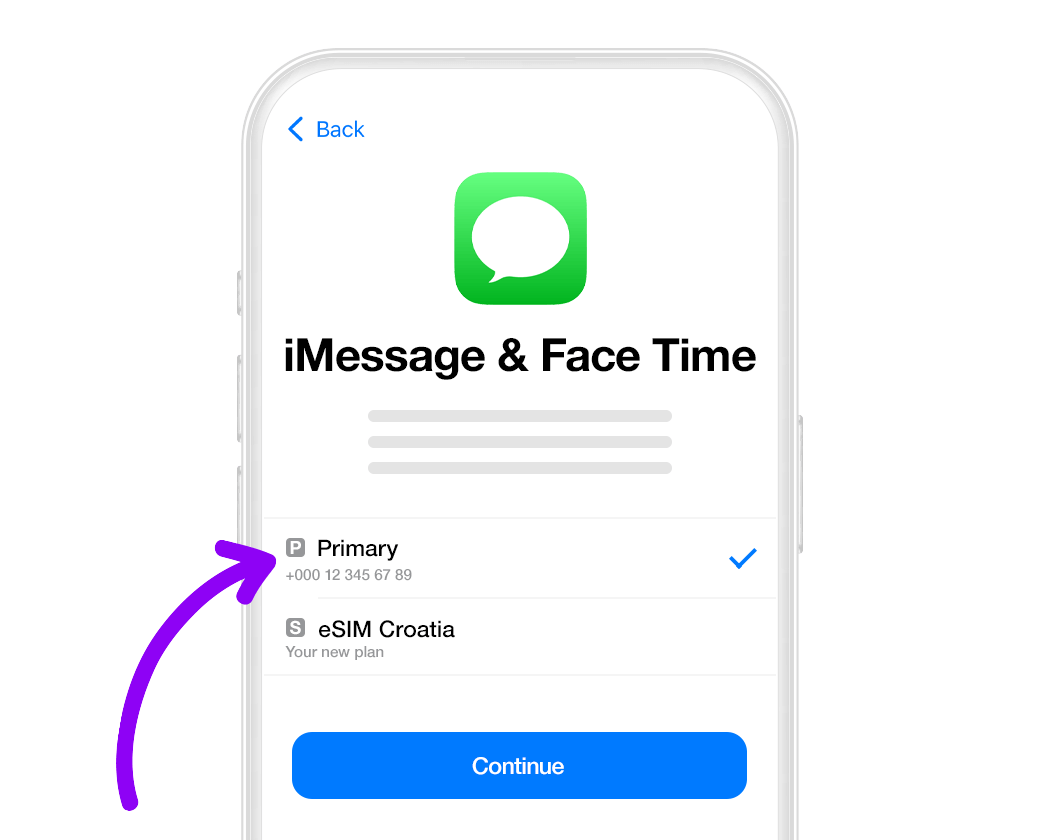
05. Configure iMessage and FaceTime
Click the Primary option to continue to use your standard SIM for Apple iMessage and FaceTime

06. Set-up mobile data
Click on Secondary to use your eSIM. Check that Allow
Mobile Data Switching is turned off to avoid data
charges while traveling
Your iPhone may activate your eSIM plan straight away. To avoid any problems, turn off roaming on all data plans until you arrive at your destination!
Ready to install your eSIM?
01.
Open your email
You should have received an email with an SM-DP + address and an Activation Code. You’ll need these to install and activate your eSIM. You should also have received an SMS with the same information.
Didn’t receive an email? Get in touch.
02.
Access Settings on your phone
Open up your settings and select Mobile Data. Next, click Add eSIM, Add Data Plan, or Use QR code.
03.
Follow the installation instructions
Select Scan QR Code then click on Enter Details Manually. Follow the steps on your iPhone to install your eSIM.
How to manually install your eSIM

01. Access iPhone setting
Open up your settings and select Mobile Data. Next, click Add eSIM, Add Data Plan, or Use QR code. Select Enter Details Manually.

02. Add your data plan
Use your iPhone to copy and paste the SM-DP + address and Activation Code where they’re required.

03. Install your NET2GO data plan
Your iPhone will show you your new data
plan.
Press "Continue" and wait for your plan
to be installed (this can take a few minutes).

You can give your data plan a name to identify it. Something like Unlimited Data Croatia is clear and simple (but it’s up to you!)

05. Select the Default Line
Click the Primary option to continue to use your standard SIM to take and make calls and send SMS.
06. Configure iMessage and FaceTime
Click the Primary option to continue to use your standard SIM for Apple iMessage and FaceTime

07. Set-up mobile data
Click on Secondary to use your eSIM. Check that Allow
Mobile Data Switching is turned off to avoid data
charges while traveling.
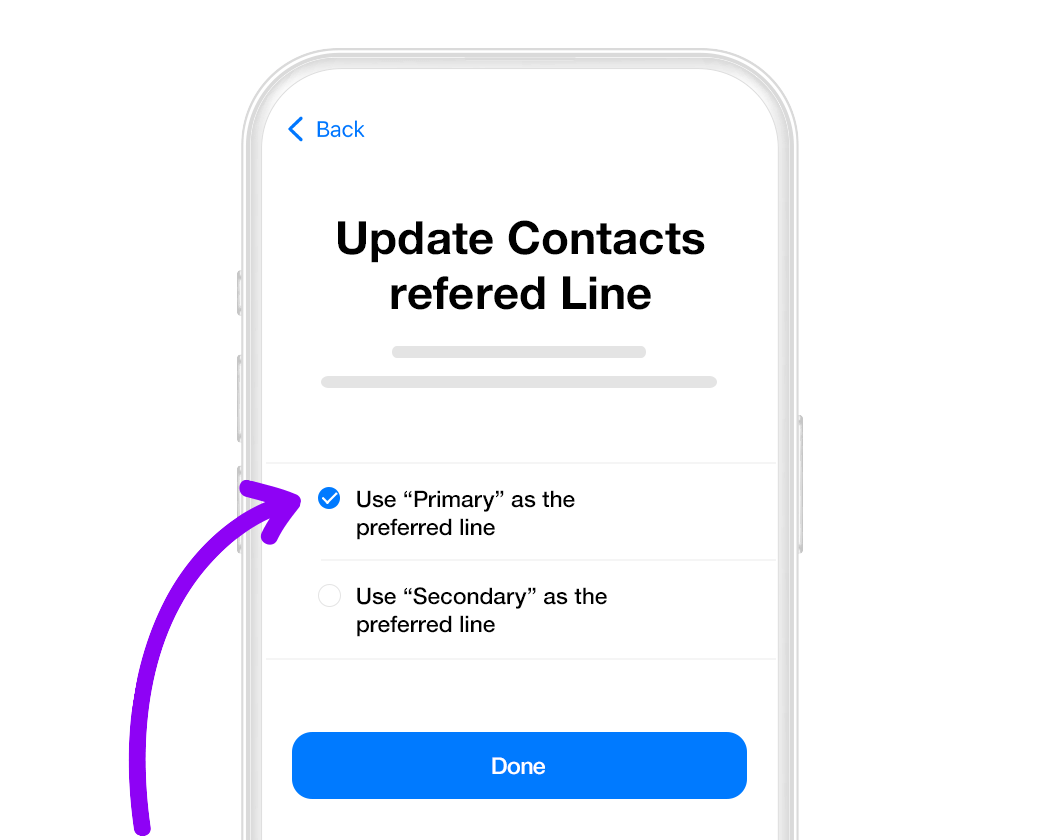
08. Set your preferred line for contacts
Sometimes your iPhone will ask you to set up a
preferred line for contacts. We recommend setting
your preferred line to Primary – to stop you from
losing information from your primary SIM or other
eSIMs.
Click Done to finish
the eSIM installation process!
Your iPhone may activate your eSIM plan straight away. To avoid any problems, turn off roaming on all data plans until you arrive at your destination!
Installed your eSIM? Let’s activate it
Activating your NET2GO eSIM is simple:
- You can only activate your eSIM when you’ve arrived at your destination
- Download this guide and keep it somewhere safe and accessible without a data connection
- To avoid problems, be sure to follow the instructions and don’t skip steps!
01.
Open “Settings” on your iPhone and click on “Mobile Data”
02.
Select Telemach from the available options
03.
Turn on “Data Roaming” for unlimited mobile internet access

Need some help with eSIM activation or installation?
Access our online chat for support, advice, and guidance on installing and activating your eSIM.

Learn step by step
Choose your eSIM installation method for Android
Before you get started with QR code, do these three things
- Have the QR code ready to be scanned on another screen or printed paper
- Ensure you have a stable connection with no dropouts
- Keep the instructions ready, as you only get one chance to install your eSIM
Do not remove the eSIM from your device as you will not be able to use it again.
Before you get started manually, do these three things
- Open your email with manual installation codes
- Ensure you have a stable connection with no dropouts
- Keep the instructions ready, as you only get one chance to install your eSIM
Do not remove the eSIM from your device as you will not be able to use it again.
Ready to install your eSIM?
01.
Access Settings
In your phone’s settings click on Connections and then SIM card manager. To start the installation process, click on Add eSIM.
02.
Open your QR code email
You’ll need to scan the QR code with your phone, so open the email we sent you on another device.
Didn’t receive an email? Get in touch.
03.
Scan the QR code to get started
The easiest way to install your eSIM is to open your Android camera and scan the QR code. Scanning the code will start your eSIM installation.
Step-by-step guide to installing your Android eSIM

01. Access settings
Access your phone’s settings and click on Connections. Ensure you’ve got a strong and stable connection to avoid any problems during your eSIM installation.

02. Click SIM card manager
Click on SIM card manager to see your options for eSIM installation.

03. Time to add your eSIM
Click Add eSIM to start the installation process.

To use your QR code, click Scan QR code from service provider. You’ll need to have the QR code on another device so you can scan it with your phone’s camera.

05. Use your camera to scan the QR code
Use your phone’s camera to scan the QR code. Move the camera so that the QR code appears in the white box on the screen. It should take a few seconds to access your eSIM details.

06. Add your mobile data plan
Once your data plan has been identified, click Add. Congratulations, your eSIM is almost set up!

07. Give your plan a name
You can change the name of your eSIM if you want to. Click on your new plan and select Name. You can call your plan whatever you want (but we recommend something simple like Croatian eSIM).
Ready to install your eSIM?
01.
Open your NET2GO email
You’ll need to have your NETGO email ready and find the activation code we sent to you.
Didn’t receive an email or code? Get in touch.
02.
Access Settings
In your phone’s settings, click on Connections and then SIM card manager. To start the installation process, click on Add eSIM.
03.
Get started with your installation
Click on the option Scan QR from service provider and then choose Enter activation code. Enter the code we sent you to start your eSIM installation!
How to manually install your eSIM

01. Access settings
Access your phone’s settings and click on Connections. Ensure you’ve got a strong and stable connection to avoid any problems during your eSIM installation.

02. Click SIM card manager
Click on SIM card manager to see your options for eSIM installation.

03. Time to add your eSIM
Click Add eSIM to start the installation process.

To use your NET2GO activation code, click Scan QR code from service provider. Instead of scanning the code, you’ll see an option to Enter activation code. Click this and type (or copy and paste) in the code we sent you. Click Continue.

05. Use your camera to scan the QR code
Use your phone’s camera to scan the QR code. Move the camera so that the QR code appears in the white box on the screen. It should take a few seconds to access your eSIM details.

06. Add your mobile data plan
Once your data plan has been found, click Add. Congratulations, your eSIM is almost set up!

07. Give your plan a name
You can change the name of your eSIM if you want to. Click on your new plan and select Name. You can call your plan whatever you want (but we recommend something simple like Croatian eSIM).
Installed your eSIM? Let’s activate it
Activating your NET2GO eSIM is simple:
- You can only use your eSIM when you’ve arrived at your destination
- Download this guide and keep it somewhere safe and accessible without a data connection
- To avoid problems, be sure to follow the instructions and don’t skip steps!
01.
Open Settings on your Android, click Connections and go to SIM manager
02.
Choose Preferred SIMs and press Mobile data. Choose your new Telemach eSIM.
03.
Turn on Data Roaming for unlimited mobile internet access.
Need some help with eSIM activation or installation?
Access our online chat for support, advice, and guidance on installing and activating your eSIM.